Web Document Viewer (WDV) supports annotating documents using toolbar buttons. It also possible to do, using the corresponding API. In this short tutorial it will be shown.
API
API for annotations drawing consists from two methods:
drawAnnotation- this method accepts an annotation configuration object and setups viewer's viewport to create an annotation.cancelDraw- this method cancels the annotation draw operation and return viewer to previous tool.
Next types will be helpful for us when we will create an annotation configuration
AnnotationData- represents generic annotation data object.AnnotationTypes- enum representing supported by WDV annotation types.
Usage
This tutorial is based on previously created web application with ASP.NET Core support, if you don't have it, then read before the tutorial Demo Application (ASP.NET Core). Alternatively, you can use your own web application and modify it.
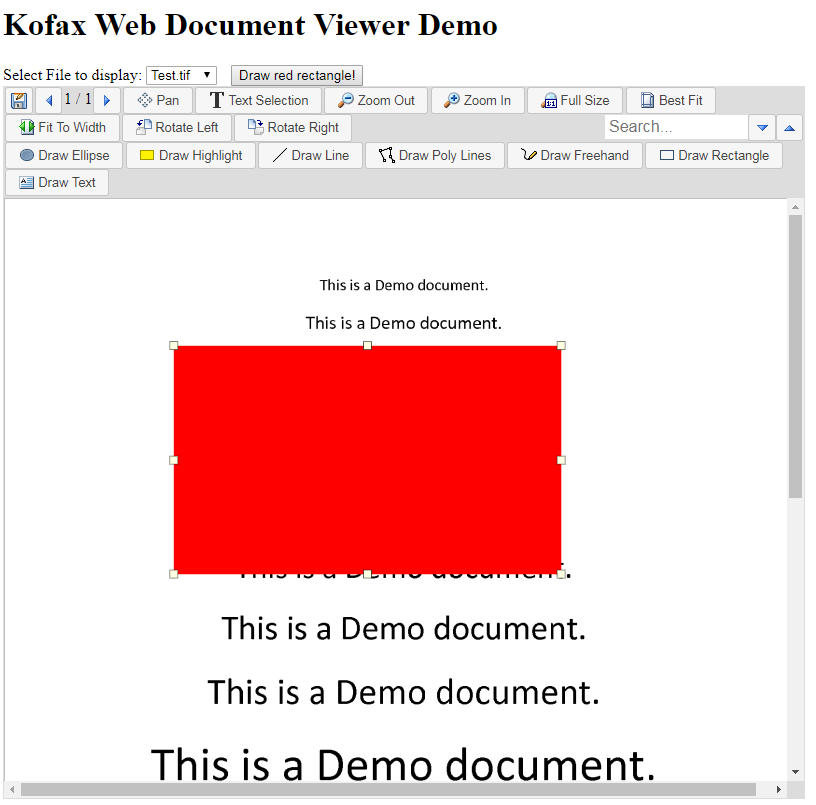
In this tutorial I will show you, how to add a button on a page, to draw a red rectangle annotation on your document, while you don't want to configure default annotation behavior in WDV.
Add new button
First of all, we need a button, to do this, I'll add a small piece of HTML code so the result HTML layout of my application will be looked like this:
<body>
    <h1>Tungsten Automation Web Document Viewer Demo</h1>
    <form id="WDVForm" runat="server">
        Select File to display:

        <select ID="FileSelectionList" onchange="loadFile();">
            <option value="images/Test.tif">Test.tif</option>
            <option value="images/Test.pdf">Test.pdf</option>
        </select>

        <!-- TUTORIAL Here we create a new button -->
        <button type="button" onclick="drawRedRectangle();" style="margin-left: 10px">Draw red rectangle!</button>
        <!-- TUTORIAL -->

        <div>
            <div class="atala-document-toolbar" style="width: 800px;"></div>
            <div class="atala-document-container" style="width: 800px; height: 600px;"></div>
        </div>

        <div id="status"></div>


    </form>
</body>
Now if you launch your application you will see that a new button placed near the files combobox. But nothing happens on click, and we need to implement new function drawRedRectangle that we mentioned as a click handler in our button.
Implement button click handler
The click handler is a very simple function, its code represented below:
function drawRedRectangle() {
    var annotationConfig = {
        // Specify the annotation type
        type: Atalasoft.Annotations.AnnotationTypes.rectangle,

        // Specify how annotation will be filled, in our case it's just red.
        //
        // NOTE, that 'opacity' explicitly set to "1", this is because,
        // WDV will mix this annotation config with its default presets,
        // and for 'rectangle' annotation the default 'fill' has 'opacity' equals to 0.
        fill: { color: 'red', opacity: 1 },

        // Specify how annotation line will be looked, again, in our case it's just red.
        // Alternatively we can set color to 'null' in order to make it invisible.
        outline: { color: 'red' },

        // Just disable rotation for our annotation, because we don't want to use in this application.
        rotatable: false
    }
    //call the method drawAnnotation and pass there our annotation config.
    _viewer.annotations.drawAnnotation(annotationConfig);
}
We need to add this function in our application and to do this, we paste it at the end of our inline script block on a page. So the result will be looked like this:
<head>
    <!-- Scripts for Web Viewing -->
    <script src="lib/jquery/dist/jquery.min.js" type="text/javascript"></script>
    <script src="lib/jquery-ui/jquery-ui.min.js" type="text/javascript"></script>
    <script src="lib/raphael/raphael.min.js"></script>
    <script src="lib/web-document-viewer/atalaWebDocumentViewer.js" type="text/javascript"></script>

    <!-- Style for Web Viewer -->
    <link href="lib/jquery-ui/themes/base/jquery-ui.min.css" rel="stylesheet" />
    <link href="lib/web-document-viewer/atalaWebDocumentViewer.css" rel="stylesheet" />

    <script type="text/javascript">

        var _viewer;

        // Show status and error messages
        function appendStatus(msg) {
            var stat = $("#status");
            stat.append(msg + "<br>");
        }

        // Initialize Web Viewing
        $(function () {
            try {
                // Initialize Web Document Viewer
                _viewer = new Atalasoft.Controls.WebDocumentViewer({
                    parent: $('.atala-document-container'),
                    toolbarparent: $('.atala-document-toolbar'),
                    'allowforms': true,
                    'allowannotations': true,
                    'allowtext': true,
                    'savepath': '.',
                    'annotations': {
                        'atala_iuname': 'mm'
                    },
                    'serverurl': 'wdv'
                });

                // Uncomment the following 2 lines if the toolbar buttons should be displayed without text
                //$('.atala-ui-button .ui-button-text').html(' ');
                //$('.atala-ui-button').css({ height: '28px', width: '28px' });

                loadFile();

            } catch (error) {
                appendStatus("Thrown error: " + error.description);
            }
        });


        function loadFile() {
            _viewer.OpenUrl($('#FileSelectionList').val(),'');
        }

        //TUTORIAL Here we add button click handler
        function drawRedRectangle() {
            var annotationConfig = {
                type: Atalasoft.Annotations.AnnotationTypes.rectangle, // we should specify the annotation type
                fill: { color: 'red' }, // specify how annotation will be filled, in our case it's just red
                outline: { color: 'red' } , // specify how annotation line will be looked, again, in our case it's just red
                rotatable: false // just disable rotation for our annotation, because we don't want to use in this application.
            };

            //call the method drawAnnotation and pass there our annotation config.
            _viewer.annotations.drawAnnotation(annotationConfig);
        }
        //TUTORIAL

    </script>

</head>
And that's it! Now if you launch your application again and then click the button, then you can start draw annotation on the viewer the same way as you clicked on a toolbar button with annotation.